> ## Documentation Index
> Fetch the complete documentation index at: https://docs.nekt.com/llms.txt
> Use this file to discover all available pages before exploring further.
# Metabase
> Connect Metabase to your data in Nekt for self-serve analytics.
Connect Metabase to your data in Nekt. How you connect depends on your cloud deployment.
| | Connector | Notes |
| :--------------- | :-------------- | :------------------------ |
| **Nekt Express** | Google BigQuery | Native Metabase connector |
| **GCP** | Google BigQuery | Native Metabase connector |
| **AWS** | Amazon Athena | Native Metabase connector |
Nekt does not have a native connector for Metabase. Registering an integration in the Nekt platform has no effect on the Metabase connection — it only helps you stay organized about your existing dashboards. The connection is configured directly in Metabase.
***
## Nekt Express
Nekt Express uses GCP infrastructure. Connect Metabase using the **Google BigQuery** database connector.
You will need a Google service account with BigQuery read access to the `nekt-hosted-infrastructure` project. Please get in touch with Nekt support to get the credentials.
1. In Metabase, go to **Admin settings** → **Databases** → **Add a database**.
2. Select **Google BigQuery** as the database type.
3. Authenticate using a service account with access to the `nekt-hosted-infrastructure` project.
4. Select the dataset (each layer is a dataset in BigQuery) and save.
If the initial connection to BigQuery exceeds Metabase's default 10-second timeout, increase it to 30 seconds. For a self-hosted Metabase, set the environment variable `MB_DB_CONNECTION_TIMEOUT_MS=30000`. On Metabase Cloud, this depends on the options available on the platform, or may require opening a support ticket with Metabase.
***
## GCP
Your Nekt workspace is on your own GCP account. Connect Metabase using **Google BigQuery** with your own project.
Refer to the [Metabase BigQuery documentation](https://www.metabase.com/docs/latest/databases/connections/bigquery) for full setup details.
1. In Metabase, go to **Admin settings** → **Databases** → **Add a database**.
2. Select **Google BigQuery**.
3. Authenticate with your GCP service account.
4. Select your project and datasets.
If the initial connection to BigQuery exceeds Metabase's default 10-second timeout, increase it to 30 seconds. For a self-hosted Metabase, set the environment variable `MB_DB_CONNECTION_TIMEOUT_MS=30000`. On Metabase Cloud, this depends on the options available on the platform, or may require opening a support ticket with Metabase.
***
## AWS
Your Nekt workspace is on your own AWS account. Connect Metabase using the **Amazon Athena** database connector.
> You will need AWS credentials — Access Key ID and Secret Access Key. Generate them using [this AWS guide](https://docs.aws.amazon.com/IAM/latest/UserGuide/access-key-self-managed.html#Using_CreateAccessKey).
Replace `{your_company_slug}` throughout with your company slug. Contact Nekt support if you don't know it.
### Step 1: Select Amazon Athena as the database
If setting up Metabase for the first time, select your database during onboarding.
For an existing Metabase account:
1. Go to **Admin settings** (gear icon menu) → **Databases** → **Add a database**.
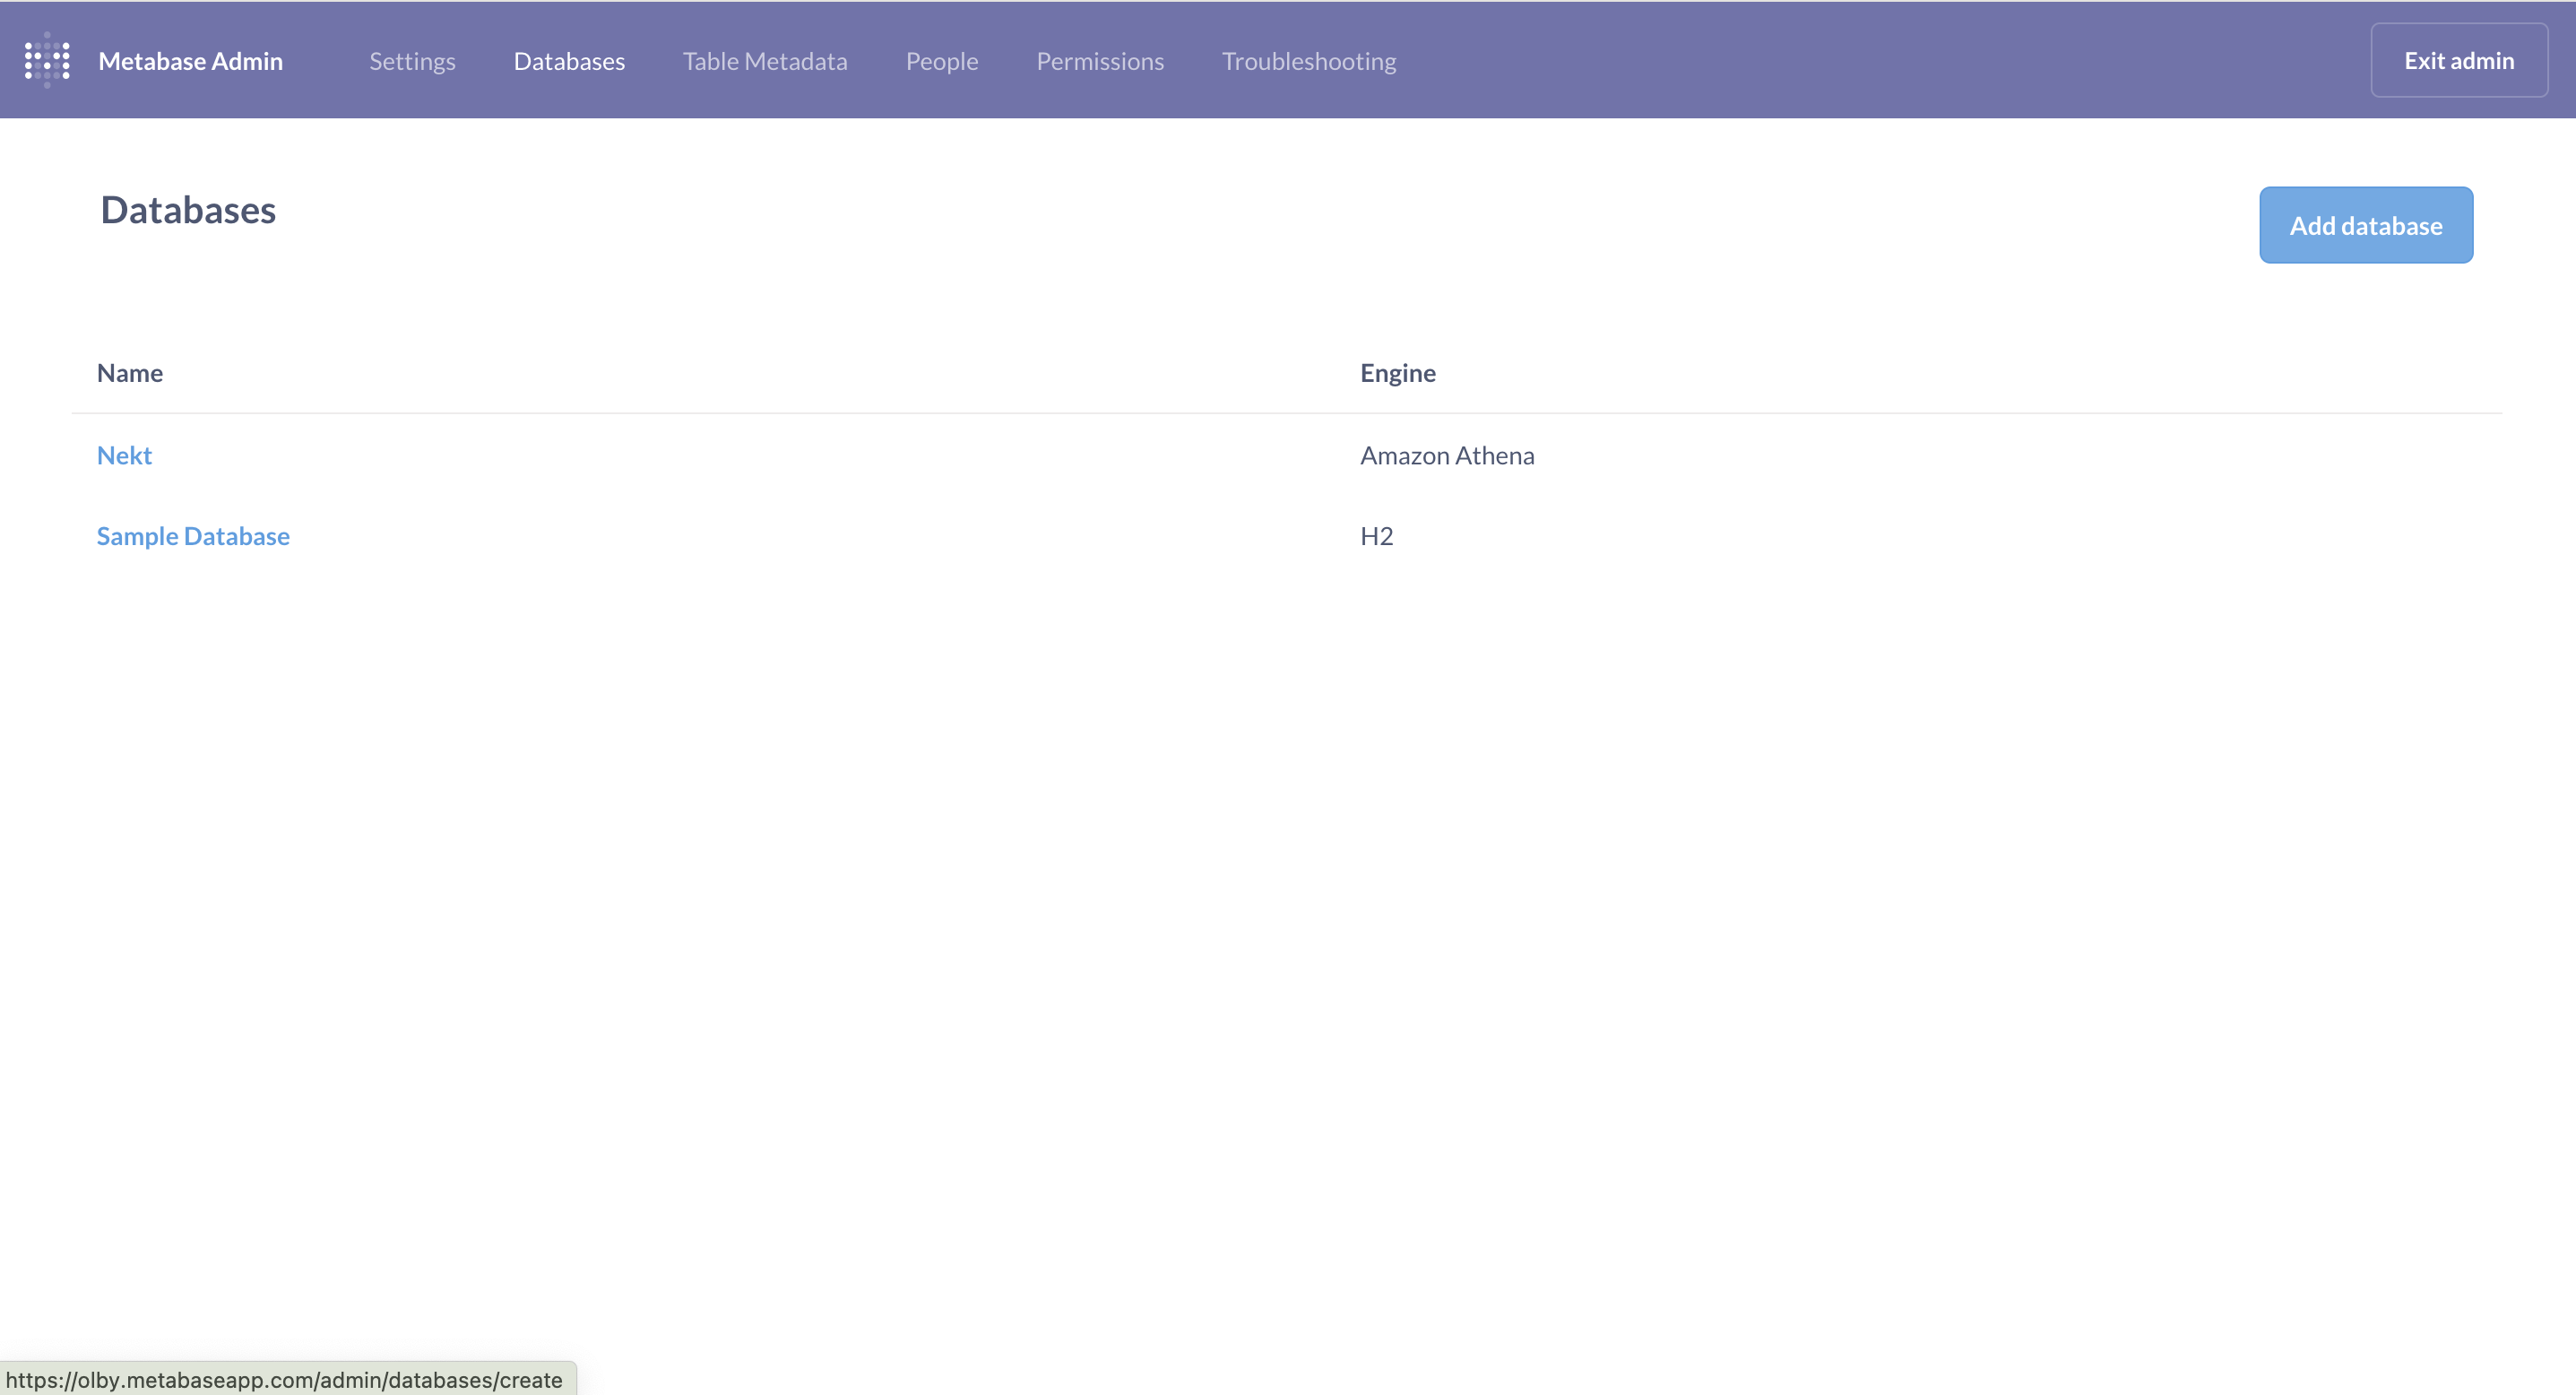 In both cases, select **Amazon Athena** as the database type.
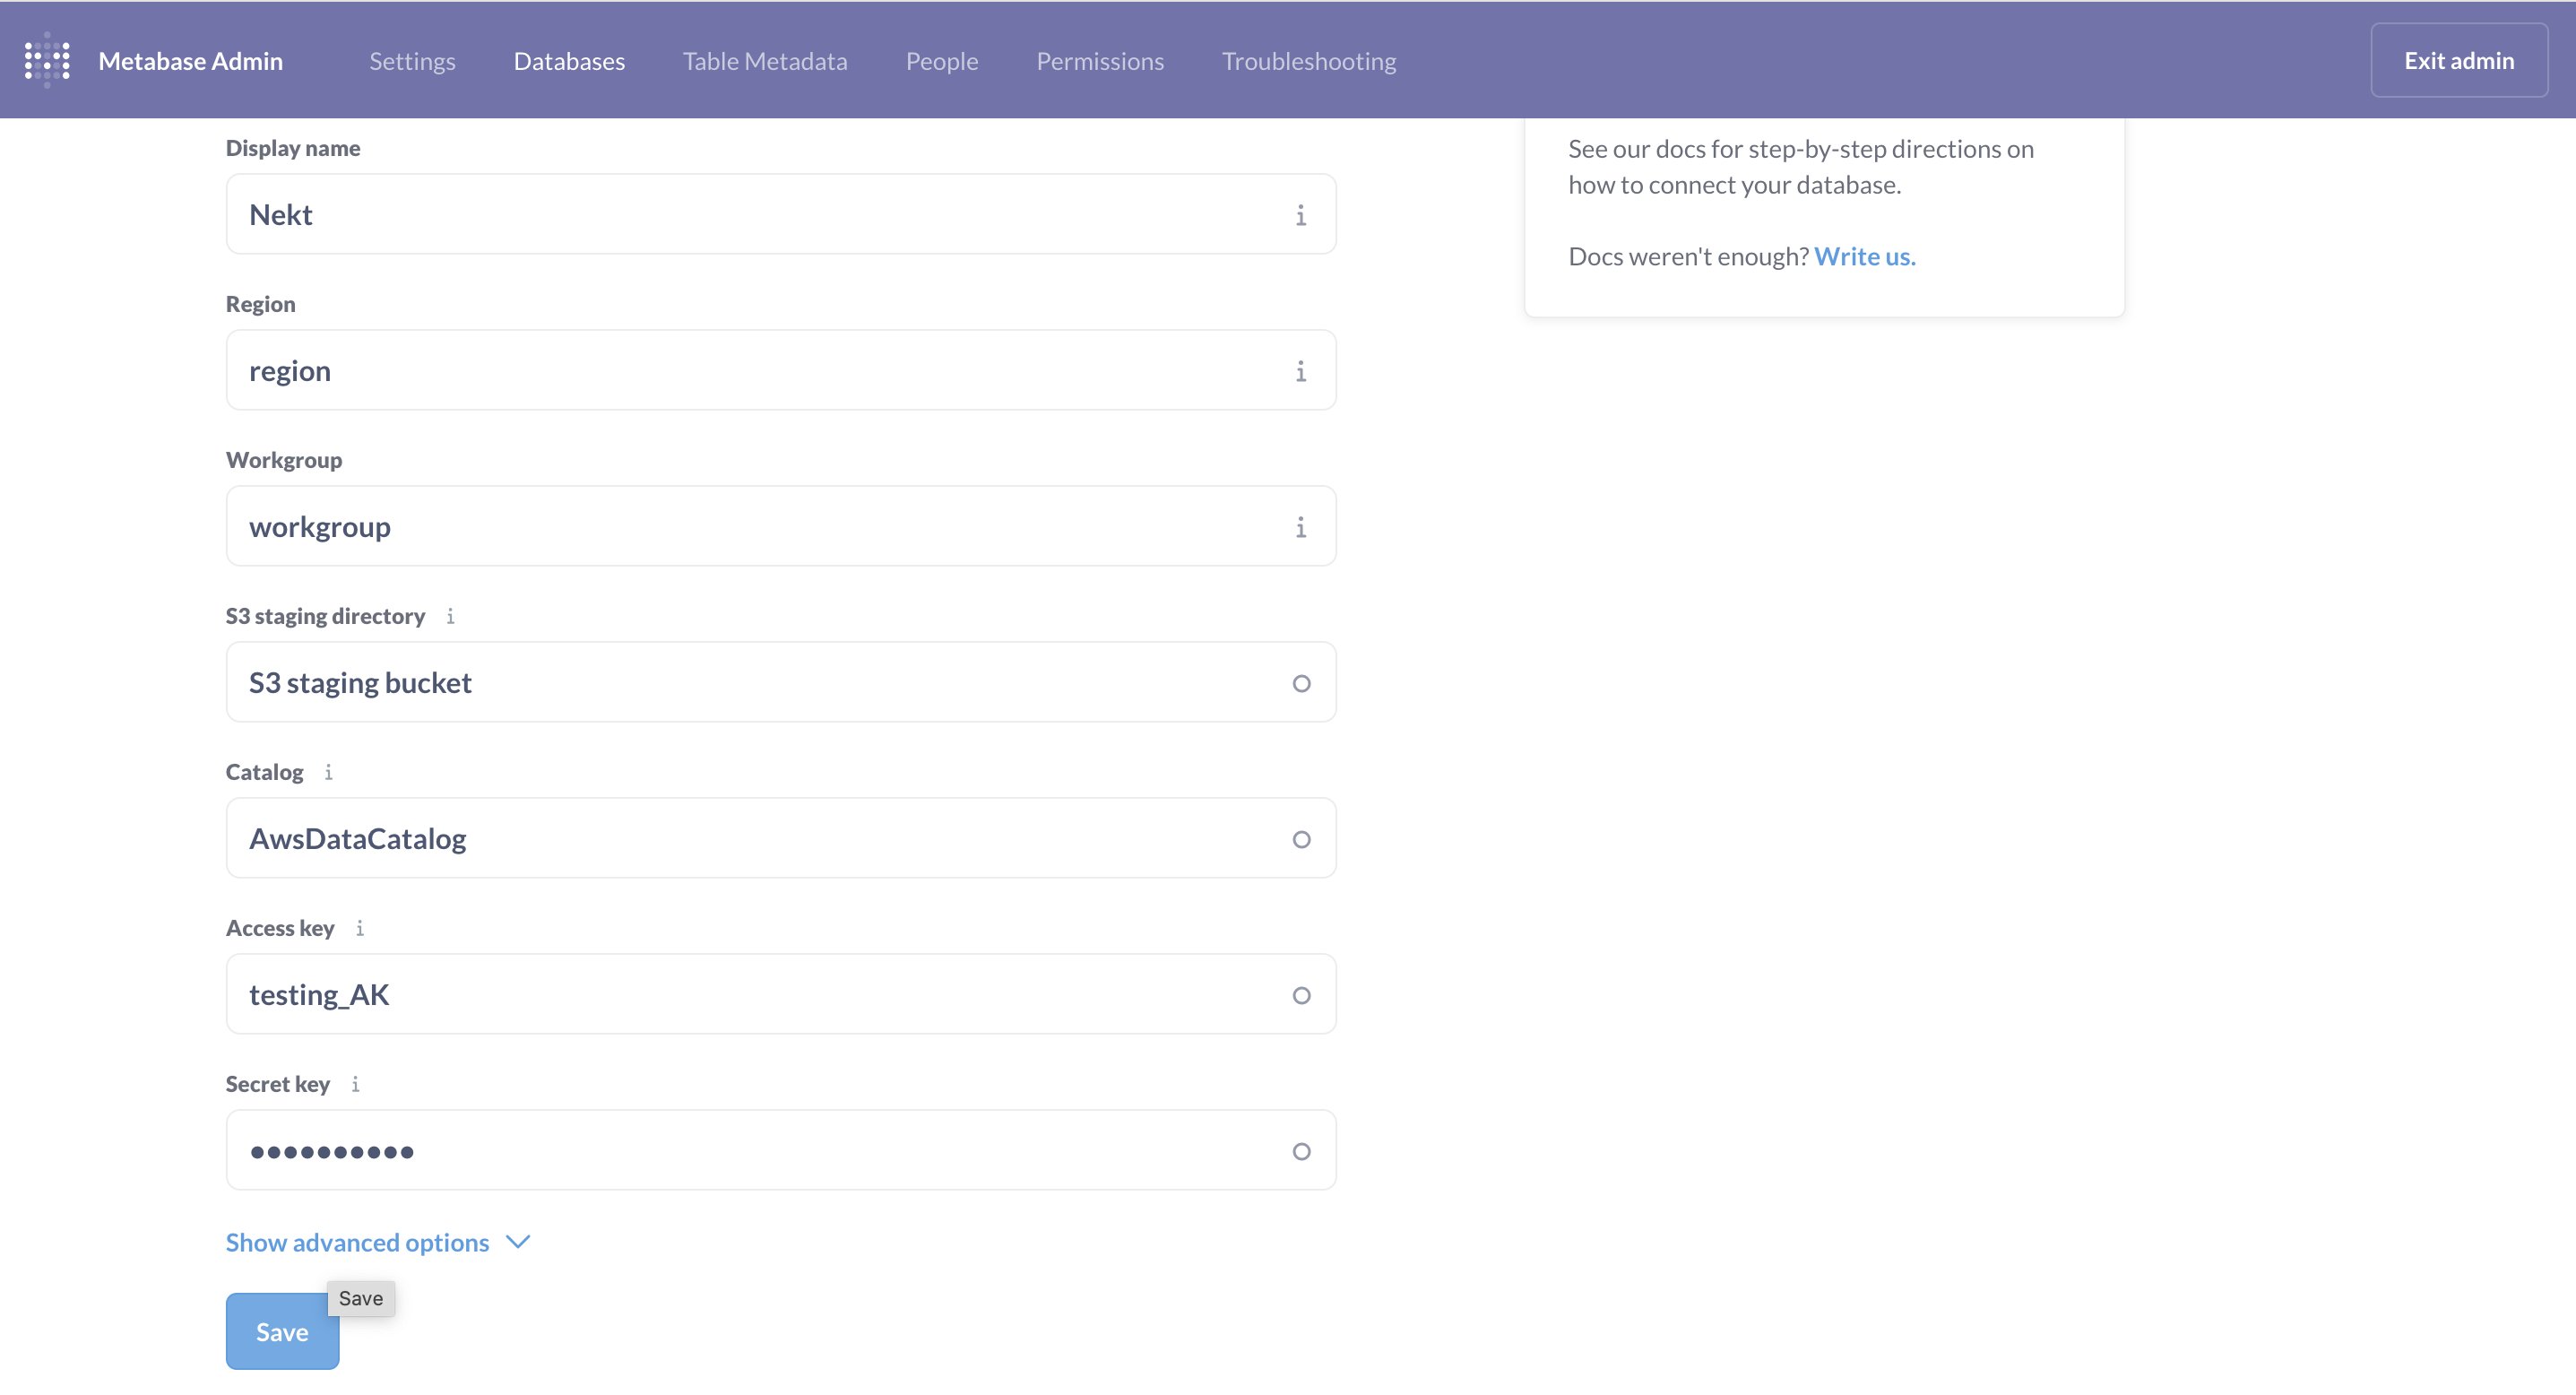
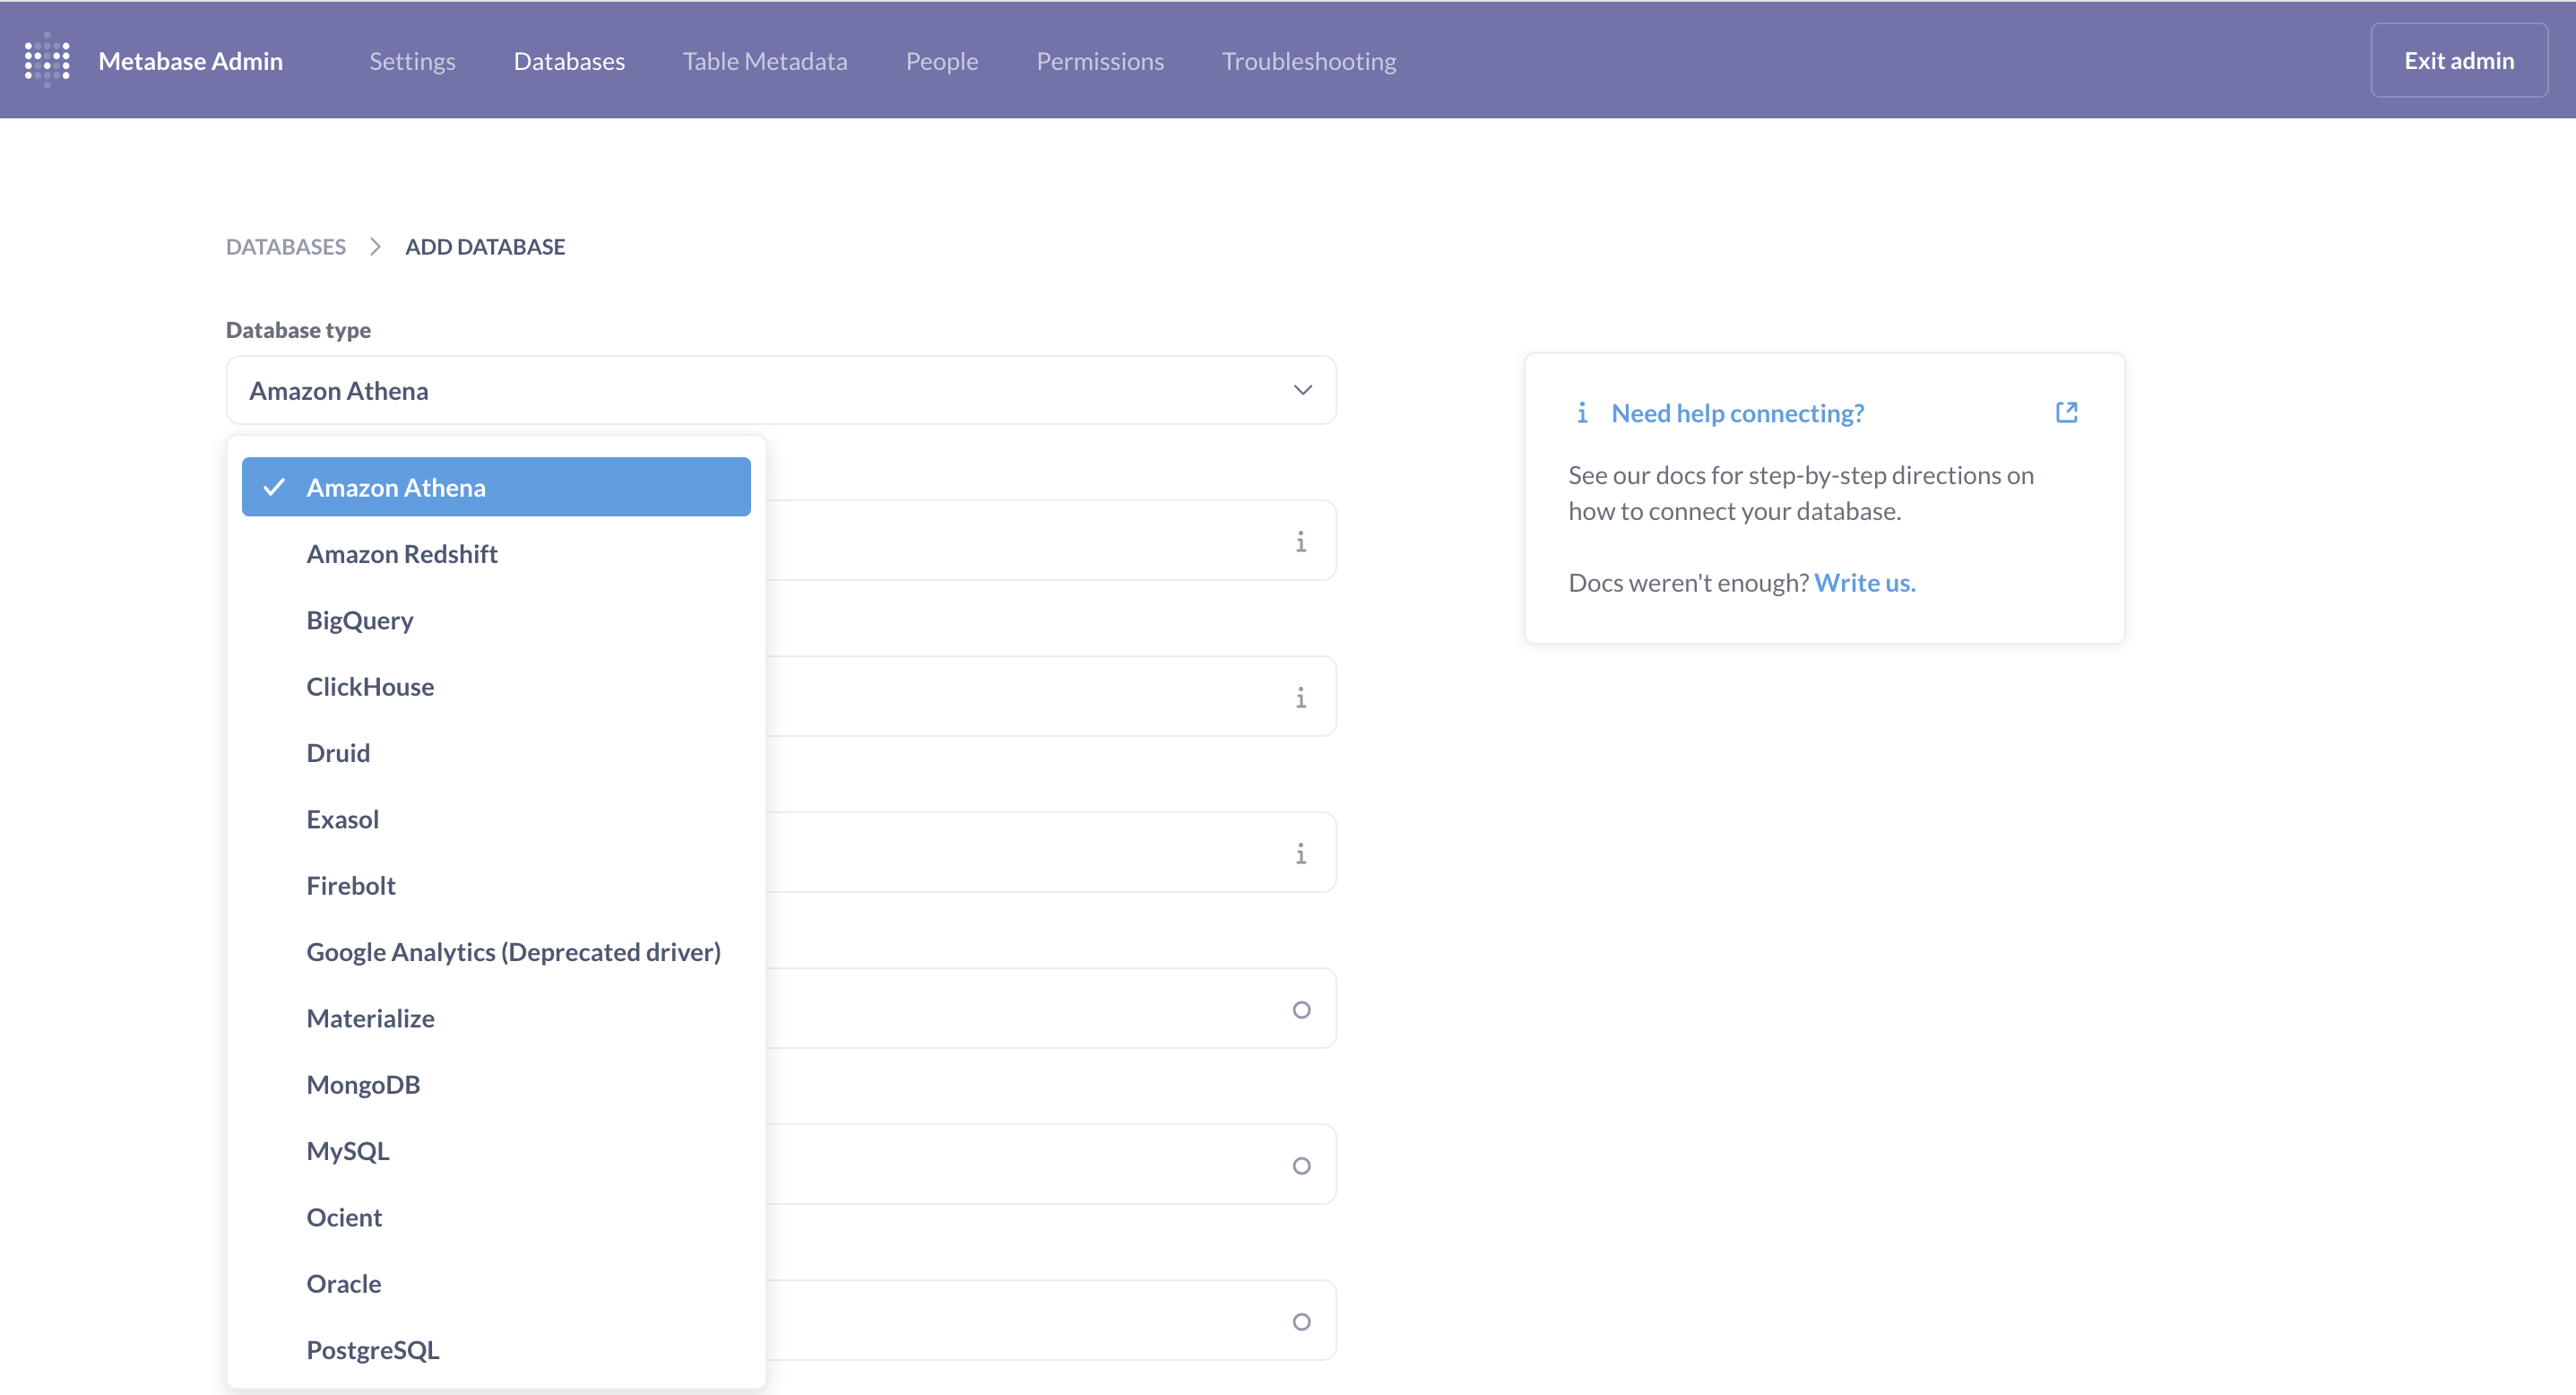 ### Step 2: Add connection details
| Field | Value |
| :----------------------- | :---------------------------------------- |
| **Display name** | Nekt |
| **Region** | `us-east-1` (confirm your actual region) |
| **Workgroup** | `primary` |
| **S3 staging directory** | `s3://nekt-lakehouse-{your_company_slug}` |
| **Catalog** | `AwsDataCatalog` |
| **Access key** | your IAM Access Key ID |
| **Secret key** | your IAM Secret Access Key |
Click **Save**.
### Step 2: Add connection details
| Field | Value |
| :----------------------- | :---------------------------------------- |
| **Display name** | Nekt |
| **Region** | `us-east-1` (confirm your actual region) |
| **Workgroup** | `primary` |
| **S3 staging directory** | `s3://nekt-lakehouse-{your_company_slug}` |
| **Catalog** | `AwsDataCatalog` |
| **Access key** | your IAM Access Key ID |
| **Secret key** | your IAM Secret Access Key |
Click **Save**.
 ### Step 3: Add the IAM policy
If using an IAM user to generate the credentials, attach the following policy to grant Metabase the necessary access:
```json theme={null}
{
"Version": "2012-10-17",
"Statement": [
{
"Action": [
"athena:BatchGetQueryExecution",
"athena:CancelQueryExecution",
"athena:GetCatalogs",
"athena:GetExecutionEngine",
"athena:GetExecutionEngines",
"athena:GetNamespace",
"athena:GetNamespaces",
"athena:GetQueryExecution",
"athena:GetQueryExecutions",
"athena:GetQueryResults",
"athena:GetQueryResultsStream",
"athena:GetTable",
"athena:GetTables",
"athena:ListQueryExecutions",
"athena:RunQuery",
"athena:StartQueryExecution",
"athena:StopQueryExecution",
"athena:ListWorkGroups",
"athena:ListEngineVersions",
"athena:GetWorkGroup",
"athena:GetDataCatalog",
"athena:GetDatabase",
"athena:GetTableMetadata",
"athena:ListDataCatalogs",
"athena:ListDatabases",
"athena:ListTableMetadata",
"athena:GetQueryRuntimeStatistics",
"athena:CreatePreparedStatement",
"athena:UpdatePreparedStatement",
"athena:GetPreparedStatement",
"athena:DeletePreparedStatement",
"athena:ListPreparedStatements"
],
"Resource": ["*"],
"Effect": "Allow"
},
{
"Action": [
"glue:GetDatabase",
"glue:GetDatabases",
"glue:GetTable",
"glue:GetTables",
"glue:GetPartition",
"glue:GetPartitions",
"glue:BatchGetPartition"
],
"Resource": ["*"],
"Effect": "Allow"
},
{
"Action": ["s3:GetBucketLocation"],
"Resource": ["arn:aws:s3:::nekt-lakehouse-{your_company_slug}"],
"Effect": "Allow"
},
{
"Action": ["lakeformation:GetDataAccess"],
"Resource": ["*"],
"Effect": "Allow"
},
{
"Action": "s3:*",
"Resource": [
"arn:aws:s3:::nekt-lakehouse-{your_company_slug}/*",
"arn:aws:s3:::nekt-lakehouse-{your_company_slug}"
],
"Effect": "Allow"
}
]
}
```
### Step 4: Explore your data
Once the database is configured and the IAM policy is attached, browse your tables in Metabase.
> For more details, see the [Metabase Amazon Athena connector documentation](https://www.metabase.com/docs/latest/databases/connections/athena).
### Step 3: Add the IAM policy
If using an IAM user to generate the credentials, attach the following policy to grant Metabase the necessary access:
```json theme={null}
{
"Version": "2012-10-17",
"Statement": [
{
"Action": [
"athena:BatchGetQueryExecution",
"athena:CancelQueryExecution",
"athena:GetCatalogs",
"athena:GetExecutionEngine",
"athena:GetExecutionEngines",
"athena:GetNamespace",
"athena:GetNamespaces",
"athena:GetQueryExecution",
"athena:GetQueryExecutions",
"athena:GetQueryResults",
"athena:GetQueryResultsStream",
"athena:GetTable",
"athena:GetTables",
"athena:ListQueryExecutions",
"athena:RunQuery",
"athena:StartQueryExecution",
"athena:StopQueryExecution",
"athena:ListWorkGroups",
"athena:ListEngineVersions",
"athena:GetWorkGroup",
"athena:GetDataCatalog",
"athena:GetDatabase",
"athena:GetTableMetadata",
"athena:ListDataCatalogs",
"athena:ListDatabases",
"athena:ListTableMetadata",
"athena:GetQueryRuntimeStatistics",
"athena:CreatePreparedStatement",
"athena:UpdatePreparedStatement",
"athena:GetPreparedStatement",
"athena:DeletePreparedStatement",
"athena:ListPreparedStatements"
],
"Resource": ["*"],
"Effect": "Allow"
},
{
"Action": [
"glue:GetDatabase",
"glue:GetDatabases",
"glue:GetTable",
"glue:GetTables",
"glue:GetPartition",
"glue:GetPartitions",
"glue:BatchGetPartition"
],
"Resource": ["*"],
"Effect": "Allow"
},
{
"Action": ["s3:GetBucketLocation"],
"Resource": ["arn:aws:s3:::nekt-lakehouse-{your_company_slug}"],
"Effect": "Allow"
},
{
"Action": ["lakeformation:GetDataAccess"],
"Resource": ["*"],
"Effect": "Allow"
},
{
"Action": "s3:*",
"Resource": [
"arn:aws:s3:::nekt-lakehouse-{your_company_slug}/*",
"arn:aws:s3:::nekt-lakehouse-{your_company_slug}"
],
"Effect": "Allow"
}
]
}
```
### Step 4: Explore your data
Once the database is configured and the IAM policy is attached, browse your tables in Metabase.
> For more details, see the [Metabase Amazon Athena connector documentation](https://www.metabase.com/docs/latest/databases/connections/athena).