> ## Documentation Index
> Fetch the complete documentation index at: https://docs.nekt.com/llms.txt
> Use this file to discover all available pages before exploring further.
# Power BI
> Connect Power BI to your data in Nekt to build reports and dashboards.
Connect Power BI to your data in Nekt. How you connect depends on your cloud deployment.
| | Connector | Token required |
| :--------------- | :---------------------------------------- | :------------- |
| **Nekt Express** | Google BigQuery (native) | No |
| **GCP** | Google BigQuery (native) | No |
| **AWS** | ODBC + Nekt custom connector (`nekt.mez`) | Yes |
***
## Nekt Express
Nekt Express uses GCP infrastructure. Connect via the native BigQuery connector using the shared Nekt project.
The new BigQuery connector implementation must be **disabled** for Nekt Express workspaces. This is a required step — see below.
### Step 1: Register the integration in Nekt
1. In the Nekt platform, go to **Integrations** and click **Add integration**.
2. Select **Power BI** from the list.
3. Enter an email address from a Google account, as that will be used to authenticate against BigQuery connector on Power BI.
4. Add a description to identify this integration.
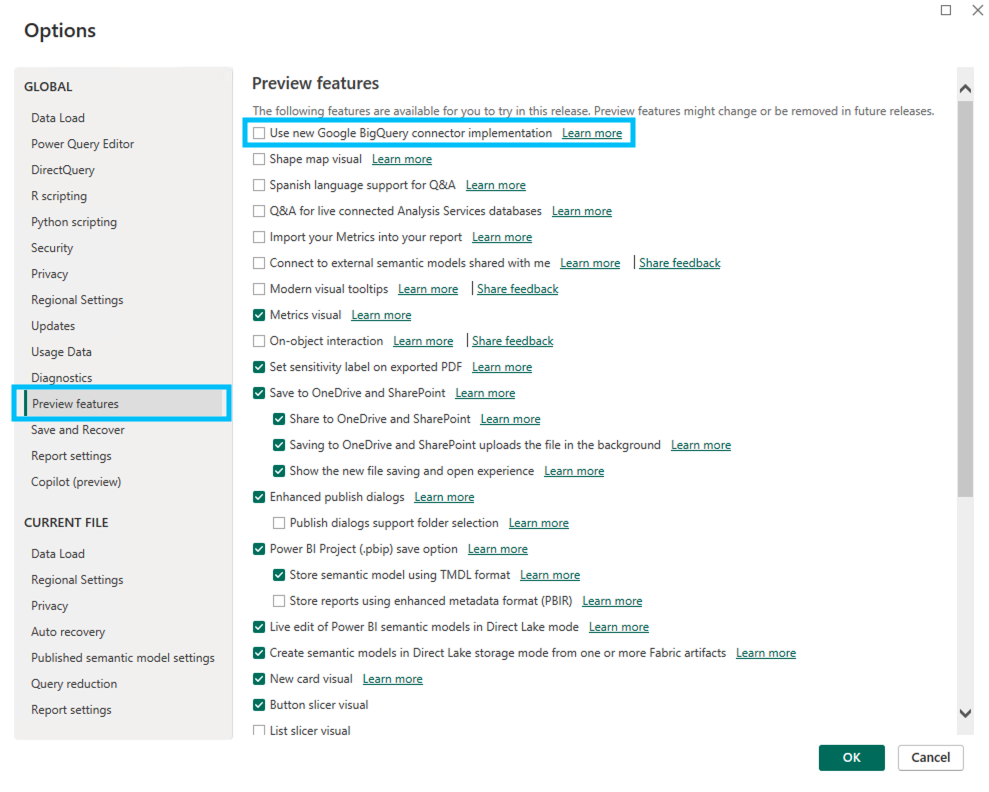
### Step 2: Disable the new BigQuery connector implementation
1. Open **Power BI Desktop**.
2. Go to **File** → **Options and settings** → **Options**.
3. Under **Preview features**, uncheck **"Use new Google BigQuery connector implementation"**.
4. Click **OK**.
This falls back to the ODBC connector instead of ADBC, which is required for Nekt Express.
### Step 3: Choose the BigQuery connector
1. Click **Home** → **Get Data** → **More...**.
2. Search for **Google BigQuery** and select it. Click **Connect**.
3. On your first use, sign in with the Google account registered in Step 1. Click **Allow** to grant permissions.
### Step 4: Select the data and load
1. In the **Navigator** panel, expand the project to browse datasets and tables.
2. Select the table(s) you want.
3. Click **Load** to import directly, or **Transform Data** to open Power Query Editor first.
***
## GCP
Your Nekt workspace is on your own GCP account. Connect using the native BigQuery connector in Power BI Desktop or Power BI Online.
### Power BI Desktop
1. Open **Power BI Desktop** and go to **Get Data**.
2. Search for and select **Google BigQuery**.
3. Optionally, expand **Advanced options** to specify a **Billing Project ID**.
4. Choose your authentication method:
* **Organizational login** — standard Google account OAuth.
* **Service Account Login** — paste the service account email and the JSON key contents (ensure the JSON has all newlines removed).
5. Click **Sign In**, complete the Google authentication prompt, then click **Connect**.
6. In the **Navigator**, browse your BigQuery datasets and tables.
7. Select a table and click **Load** or **Transform Data**.
### Power BI Online (Service)
1. In the Power BI web app, choose **Get Data**.
2. Select **Google BigQuery**.
3. Create a new connection or reuse an existing one.
4. Select your authentication method (organizational account or service account).
5. Sign in and browse to your BigQuery tables. Click **Next**.
### Authentication notes
* **Organizational Account**: standard Google OAuth with your user account.
* **Service Account**: for Power BI Service or Power Query Online, use **Basic authentication** — username = service account email, password = flattened JSON key (no newlines).
* If you encounter permission errors, verify your IAM roles include sufficient BigQuery permissions.
* Nested fields may appear as JSON strings; use Power Query to expand or parse them.
***
## AWS
Your Nekt workspace is on your own AWS account. Connection uses an ODBC driver and Nekt's custom Power BI connector (`nekt.mez`). A scoped access token is required.
### Requirements
* Power BI Desktop installed from the **official website** (not the Microsoft Store — Store installations block custom connectors).
### Step 1: Generate a token
1. In the Nekt platform, go to **Integrations** and click **Add integration**.
2. Select **Power BI** as the integration type.
3. Select the tables you want to make available.
The token grants access only to the tables selected here. You can create multiple tokens for different sets of tables.
4. Click **Next**.
5. Give the integration a description and optionally add a report link.
6. Click **Next**, then copy the **Identifier** (e.g. `power-bi-abcd`) and the **Token** from the Integrations page.
### Step 2: Install the ODBC driver
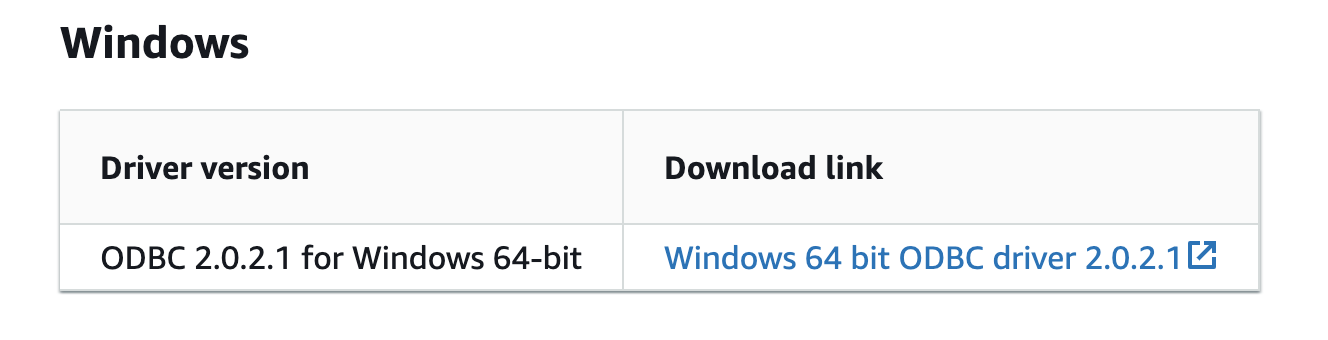
Download and install the **Amazon Athena ODBC 2.x** driver for Windows from [AWS documentation](https://docs.aws.amazon.com/athena/latest/ug/odbc-v2-driver.html).
### Step 3: Download and place the Nekt connector
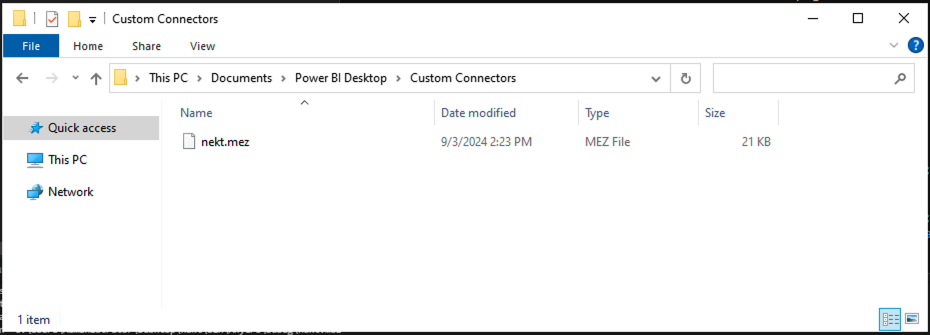
[Download `nekt.mez`](https://public.nekt.ai/bi-connectors/pbi/nekt_v1_1_2.mez) and place it in:
```
[Documents]\Microsoft Power BI Desktop\Custom Connectors\
```
Create the folder if it doesn't exist.
The exact folder path may vary. Make sure the file is inside the Custom Connectors folder within the Power BI Desktop directory.
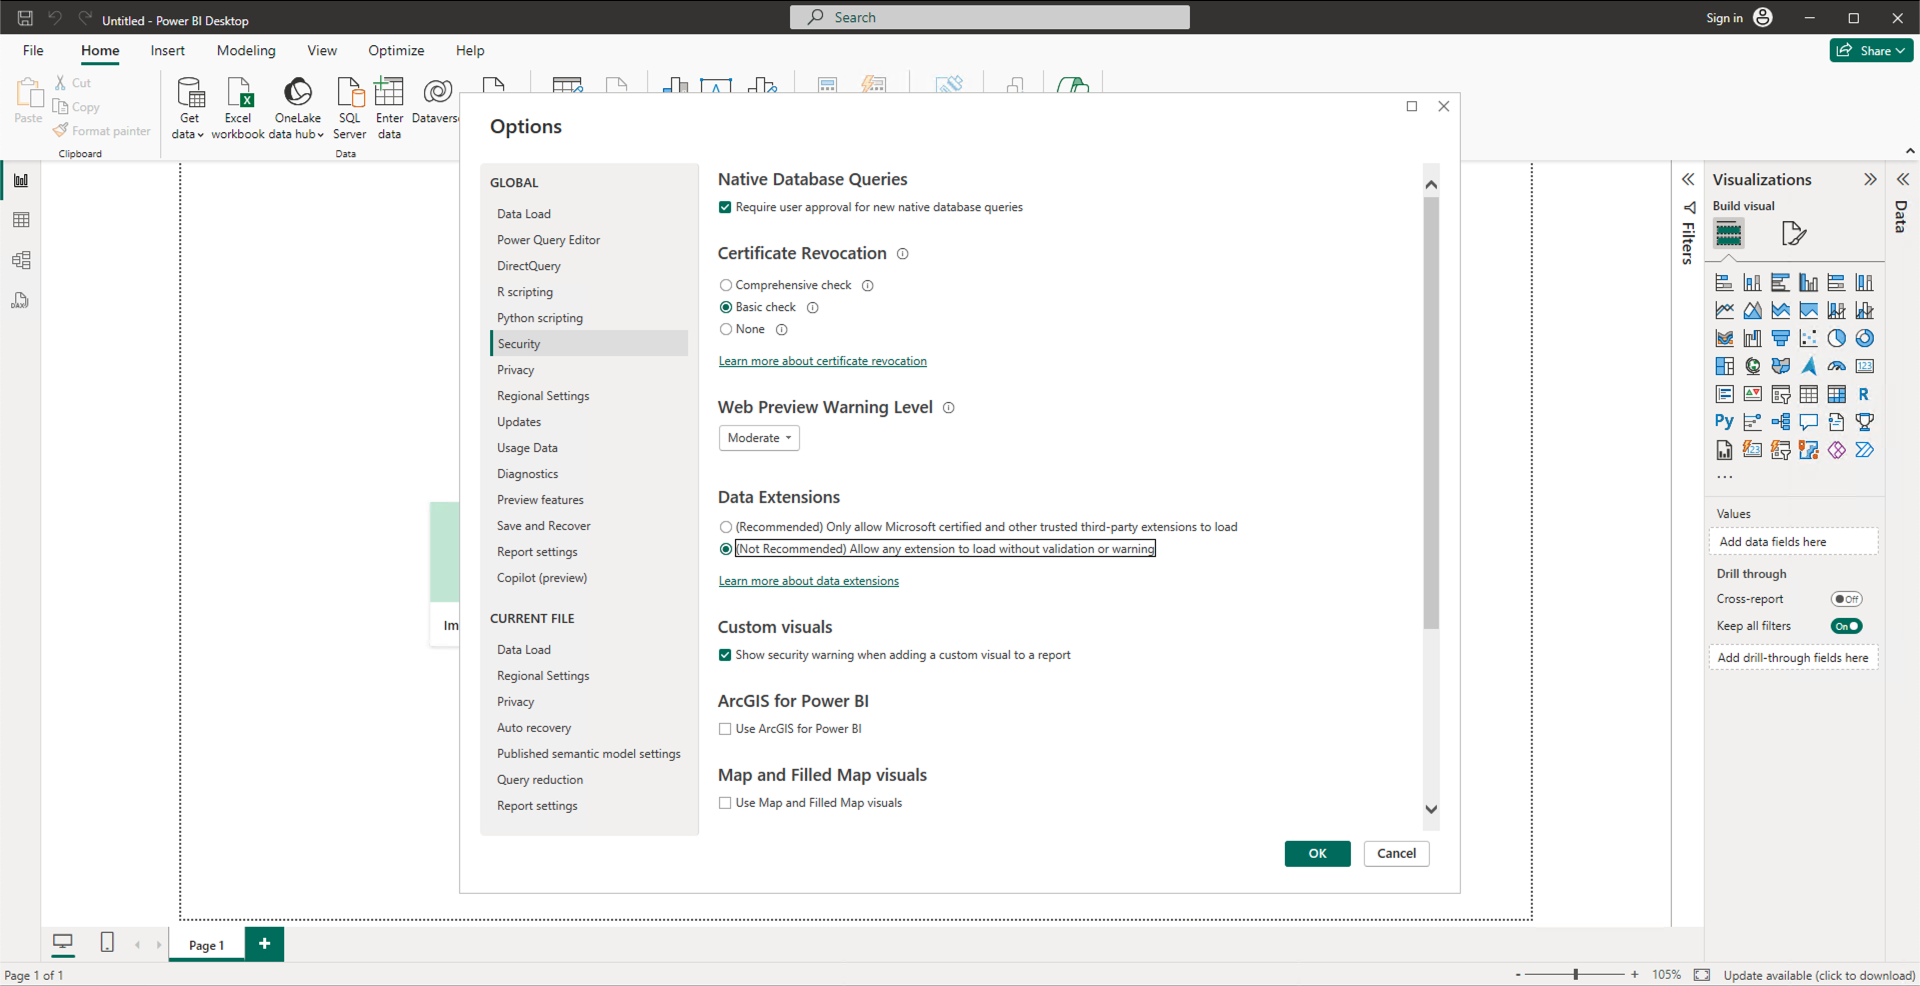
### Step 4: Allow external connectors
1. In Power BI Desktop, go to **File** → **Options and settings** → **Options**.
2. Go to **Security** → **Data Extensions**.
3. Select **"Allow any extension to load without validation or warning"**.
### Step 5: Connect
1. Open a new file in Power BI Desktop and click **Get Data**.
2. Search for and select **Nekt** as the data source.
3. Enter the **Identifier** from your integration (e.g. `power-bi-abcd`). Click **OK**.
4. Enter the **Token**. Click **Connect**.
5. Select the tables you want and proceed normally.
### Troubleshooting
* Use the most recent version of Power BI Desktop, the ODBC driver, and the `nekt.mez` file.
* Confirm Power BI was installed from the official website, not the Microsoft Store.
***
### Automatic refresh with a gateway (AWS)
To enable scheduled data refresh in Power BI Service, you need an **On-Premises Data Gateway** running on a machine that has the ODBC driver and `nekt.mez` installed.
#### On the gateway machine
Ensure the following are installed and up to date on the gateway machine:
* Power BI Desktop
* On-Premises Data Gateway
* Amazon Athena ODBC 2.x driver
* `nekt.mez` in the `[Documents]\Power BI Desktop\Custom Connectors` folder
* External connectors allowed in Power BI's Data Extensions settings
#### Configure the On-Premises Data Gateway
1. Open the **On-Premises Data Gateway** app and complete installation.
2. In the **'Email address to use with this gateway'** field, enter the email used in Power BI Service.
3. Log in with your Power BI Service account.
4. Select **Register a new gateway on this computer**.
5. Give the gateway a name (e.g. `aws-gateway`) and set a recovery key. Click **Configure**.
The gateway is now online.
**Grant the gateway user access to the connector folder:**
1. Check which user the gateway runs as: open the gateway app → **Service Settings**. The default is `NT SERVICE\PBIEgwService`.
2. Right-click the Custom Connectors folder → **Properties** → **Security** tab → **Edit**.
3. Click **Add**, type `NT SERVICE\PBIEgwService`, click **Check Names**, then **OK**.
4. Grant **Read & execute**, **List folder contents**, and **Read** permissions. Click **Apply** then **OK**.
5. In the gateway app, go to **Connectors** and point it to your Custom Connectors folder. Click **Apply** — the gateway will restart. If the Nekt connector doesn't appear, restart the gateway from **Service Settings**.
#### Publish and configure in Power BI Service
1. **Publish** your semantic model from Power BI Desktop while logged in to your Power BI Service account.
2. In Power BI Service, go to **Settings** → **Manage connections and gateways**. The gateway should appear under **On-premises data gateways**.
3. Open the gateway settings:
* **General**: enable "Distribute requests across all active gateways in this cluster".
* **Power BI**: enable "Allow user's cloud data sources to refresh through this gateway cluster" and "Allow user's custom data connectors to refresh through this gateway cluster". Click **Save**.
#### Add the data source to the gateway
1. Open the semantic model's settings → **Gateway and cloud connections**.
2. The data source will show "Not properly configured". Click the play icon → **Add manually to gateway**.
3. Configure:
* **Connection name**: use the Integration Identifier (e.g. `power-bi-abcd`)
* **Visualization identifier**: the Integration Identifier
* **Authentication method**: Visualization Token
* **Visualization token**: the token from your integration in Nekt
4. Click **Create**.
5. In the dropdown, select the gateway for this semantic model. Click **Apply**.
Repeat this process for each semantic model you want to configure with the gateway.
#### Set up automatic refresh
In the semantic model settings → **Refresh**, configure the schedule and click **Apply**. All reports using this model will refresh on that schedule.
If you don't have a local Windows machine to run the gateway, you can use a Windows EC2 instance on AWS.
#### 1. Launch a Windows EC2 instance
1. Log in to the AWS Console and go to **EC2** → **Launch instance**.
2. Configure:
* **Name**: `power-bi-gateway` (or any descriptive name)
* **OS**: Microsoft Windows Server 2025 Base (Quick Start tab)
* **Instance type**: `t3.medium` minimum (2 vCPU, 4 GiB RAM, \~\$0.06/hr)
* **Key pair**: select or create one (needed for RDP access)
* **Network settings**: create a security group and allow RDP traffic from your IP
* **Storage**: 60 GiB gp3 root volume
3. Click **Launch instance**.
#### 2. Connect via Remote Desktop (RDP)
1. In EC2, select the instance → **Connect** → **RDP Client** tab.
2. Click **Get Password**, upload the key pair file, and click **Decrypt password**.
3. Note the **Public DNS**, **Username**, and **Password**.
4. Install **Microsoft Remote Desktop** on your local machine.
5. Add a new PC: paste the Public DNS, add a user account with the Username and Password, then connect.
#### 3. Configure Power BI on the instance
Inside the Windows instance, install:
* [Power BI Desktop (latest)](https://www.microsoft.com/download/details.aspx?id=58494)
* [On-Premises Data Gateway (latest)](https://www.microsoft.com/download/details.aspx?id=53127)
Then follow the [gateway setup](#automatic-refresh-with-a-gateway-aws) steps above to complete the configuration.
 This falls back to the ODBC connector instead of ADBC, which is required for Nekt Express.
### Step 3: Choose the BigQuery connector
1. Click **Home** → **Get Data** → **More...**.
2. Search for **Google BigQuery** and select it. Click **Connect**.
3. On your first use, sign in with the Google account registered in Step 1. Click **Allow** to grant permissions.
### Step 4: Select the data and load
1. In the **Navigator** panel, expand the project to browse datasets and tables.
2. Select the table(s) you want.
3. Click **Load** to import directly, or **Transform Data** to open Power Query Editor first.
***
## GCP
Your Nekt workspace is on your own GCP account. Connect using the native BigQuery connector in Power BI Desktop or Power BI Online.
### Power BI Desktop
1. Open **Power BI Desktop** and go to **Get Data**.
2. Search for and select **Google BigQuery**.
3. Optionally, expand **Advanced options** to specify a **Billing Project ID**.
4. Choose your authentication method:
* **Organizational login** — standard Google account OAuth.
* **Service Account Login** — paste the service account email and the JSON key contents (ensure the JSON has all newlines removed).
5. Click **Sign In**, complete the Google authentication prompt, then click **Connect**.
6. In the **Navigator**, browse your BigQuery datasets and tables.
7. Select a table and click **Load** or **Transform Data**.
### Power BI Online (Service)
1. In the Power BI web app, choose **Get Data**.
2. Select **Google BigQuery**.
3. Create a new connection or reuse an existing one.
4. Select your authentication method (organizational account or service account).
5. Sign in and browse to your BigQuery tables. Click **Next**.
### Authentication notes
* **Organizational Account**: standard Google OAuth with your user account.
* **Service Account**: for Power BI Service or Power Query Online, use **Basic authentication** — username = service account email, password = flattened JSON key (no newlines).
* If you encounter permission errors, verify your IAM roles include sufficient BigQuery permissions.
* Nested fields may appear as JSON strings; use Power Query to expand or parse them.
***
## AWS
Your Nekt workspace is on your own AWS account. Connection uses an ODBC driver and Nekt's custom Power BI connector (`nekt.mez`). A scoped access token is required.
### Requirements
* Power BI Desktop installed from the **official website** (not the Microsoft Store — Store installations block custom connectors).
### Step 1: Generate a token
1. In the Nekt platform, go to **Integrations** and click **Add integration**.
2. Select **Power BI** as the integration type.
3. Select the tables you want to make available.
This falls back to the ODBC connector instead of ADBC, which is required for Nekt Express.
### Step 3: Choose the BigQuery connector
1. Click **Home** → **Get Data** → **More...**.
2. Search for **Google BigQuery** and select it. Click **Connect**.
3. On your first use, sign in with the Google account registered in Step 1. Click **Allow** to grant permissions.
### Step 4: Select the data and load
1. In the **Navigator** panel, expand the project to browse datasets and tables.
2. Select the table(s) you want.
3. Click **Load** to import directly, or **Transform Data** to open Power Query Editor first.
***
## GCP
Your Nekt workspace is on your own GCP account. Connect using the native BigQuery connector in Power BI Desktop or Power BI Online.
### Power BI Desktop
1. Open **Power BI Desktop** and go to **Get Data**.
2. Search for and select **Google BigQuery**.
3. Optionally, expand **Advanced options** to specify a **Billing Project ID**.
4. Choose your authentication method:
* **Organizational login** — standard Google account OAuth.
* **Service Account Login** — paste the service account email and the JSON key contents (ensure the JSON has all newlines removed).
5. Click **Sign In**, complete the Google authentication prompt, then click **Connect**.
6. In the **Navigator**, browse your BigQuery datasets and tables.
7. Select a table and click **Load** or **Transform Data**.
### Power BI Online (Service)
1. In the Power BI web app, choose **Get Data**.
2. Select **Google BigQuery**.
3. Create a new connection or reuse an existing one.
4. Select your authentication method (organizational account or service account).
5. Sign in and browse to your BigQuery tables. Click **Next**.
### Authentication notes
* **Organizational Account**: standard Google OAuth with your user account.
* **Service Account**: for Power BI Service or Power Query Online, use **Basic authentication** — username = service account email, password = flattened JSON key (no newlines).
* If you encounter permission errors, verify your IAM roles include sufficient BigQuery permissions.
* Nested fields may appear as JSON strings; use Power Query to expand or parse them.
***
## AWS
Your Nekt workspace is on your own AWS account. Connection uses an ODBC driver and Nekt's custom Power BI connector (`nekt.mez`). A scoped access token is required.
### Requirements
* Power BI Desktop installed from the **official website** (not the Microsoft Store — Store installations block custom connectors).
### Step 1: Generate a token
1. In the Nekt platform, go to **Integrations** and click **Add integration**.
2. Select **Power BI** as the integration type.
3. Select the tables you want to make available.
 ### Step 3: Download and place the Nekt connector
[Download `nekt.mez`](https://public.nekt.ai/bi-connectors/pbi/nekt_v1_1_2.mez) and place it in:
```
[Documents]\Microsoft Power BI Desktop\Custom Connectors\
```
Create the folder if it doesn't exist.
### Step 3: Download and place the Nekt connector
[Download `nekt.mez`](https://public.nekt.ai/bi-connectors/pbi/nekt_v1_1_2.mez) and place it in:
```
[Documents]\Microsoft Power BI Desktop\Custom Connectors\
```
Create the folder if it doesn't exist.
 ### Step 4: Allow external connectors
1. In Power BI Desktop, go to **File** → **Options and settings** → **Options**.
2. Go to **Security** → **Data Extensions**.
3. Select **"Allow any extension to load without validation or warning"**.
### Step 4: Allow external connectors
1. In Power BI Desktop, go to **File** → **Options and settings** → **Options**.
2. Go to **Security** → **Data Extensions**.
3. Select **"Allow any extension to load without validation or warning"**.
 ### Step 5: Connect
1. Open a new file in Power BI Desktop and click **Get Data**.
2. Search for and select **Nekt** as the data source.
3. Enter the **Identifier** from your integration (e.g. `power-bi-abcd`). Click **OK**.
4. Enter the **Token**. Click **Connect**.
5. Select the tables you want and proceed normally.
### Troubleshooting
* Use the most recent version of Power BI Desktop, the ODBC driver, and the `nekt.mez` file.
* Confirm Power BI was installed from the official website, not the Microsoft Store.
***
### Automatic refresh with a gateway (AWS)
To enable scheduled data refresh in Power BI Service, you need an **On-Premises Data Gateway** running on a machine that has the ODBC driver and `nekt.mez` installed.
### Step 5: Connect
1. Open a new file in Power BI Desktop and click **Get Data**.
2. Search for and select **Nekt** as the data source.
3. Enter the **Identifier** from your integration (e.g. `power-bi-abcd`). Click **OK**.
4. Enter the **Token**. Click **Connect**.
5. Select the tables you want and proceed normally.
### Troubleshooting
* Use the most recent version of Power BI Desktop, the ODBC driver, and the `nekt.mez` file.
* Confirm Power BI was installed from the official website, not the Microsoft Store.
***
### Automatic refresh with a gateway (AWS)
To enable scheduled data refresh in Power BI Service, you need an **On-Premises Data Gateway** running on a machine that has the ODBC driver and `nekt.mez` installed.