Configuring Slack as a Source
In the Sources tab, click on the “Add source” button located at the top right of your screen. Then, select the Slack option from the list of connectors. Click Next and you’ll be prompted to add the connector configuration.1. Add account access
-
Authorization: First of all, authorize Nekt through the Slack Authorization button. You must be an App Manager to authorize the installation of our app into your workspace.
You’ll see the following warning when installing the app:
This app is not approved by Slack. Apps are reviewed to ensure a quality experience.This occurs because our app is private and not yet available in the Slack marketplace. -
Channel types: The types of conversations the tap will attempt to extract data from. Options are
public_channelorprivate_channel. Currently, fetching messages from DMs with a bot user is not allowed. -
Auto join public channels: Whether the bot user should attempt to join public channels that it has not yet joined. The bot user must be a member of the channel to be able to retrieve messages. For private channels, you have to manually add the bot to the channel. Here’s the step by step:
- Type the command
/addin the message input box of the channel you want to add the bot. - Choose
Add apps to your channel. - Select the
Nekt Sourceapp. - Done, you’ll be able to extract messages from this channel.
Repeat this process for all channels you want to get data from. - Type the command
-
List IDs: An array of list IDs you want to extract. If not provided, then no lists will be synced. Unfortunately, Slack doesn’t provide a public API to get all lists, so you have to manually add the list IDs.
To find a Slack list ID, look at the URL of the list’s page in your browser. A list item’s ID is generated when you right-click on the item and select “copy link” from the menu. For example, in the URL
https://your-workspace.slack.com/lists/T01G4A1C55X/F08LW24UL3Cthe ID corresponds to the last part of the URL, which isF08LW24UL3C. - Start date: Defines from which date we should start syncing messages.
- Thread lookback (days): The number of days to look in the past for new thread replies to existing messages.
- Selected channels: An array of channel IDs you want to select for extraction. This helps reduce the extraction time by only selecting channels of interest.
-
Excluded channels: An array of channel IDs you want to exclude from extraction. This helps reduce the extraction time by excluding channels that contain bots or flooding messages.
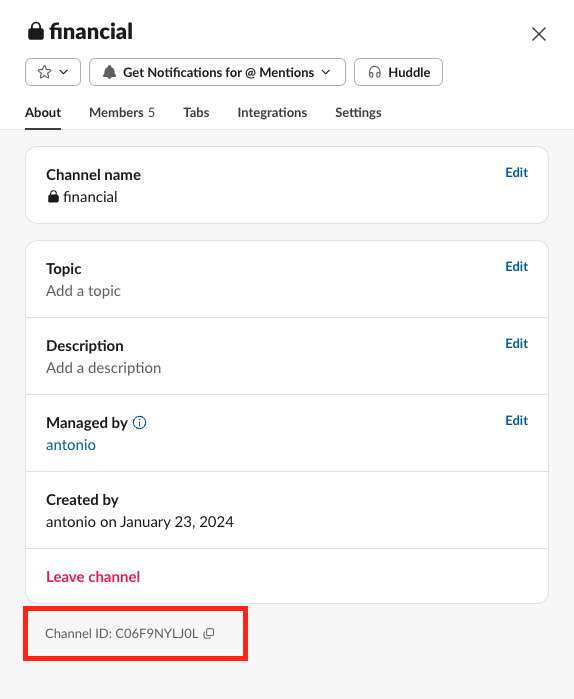
The channel ID can be found by clicking with the right button on the channel name and ‘View details’. The channel ID will be available at the bottom of the modal.
2. Select streams
- The next step is letting us know which streams you want to bring. You can select entire groups of streams or only a subset of them.
- Click Next.
3. Configure data streams
Customize how you want your data to appear in your catalog. Select a name for each table (which will contain the fetched data) and the type of sync.- Table name: we suggest a name, but feel free to customize it. You have the option to add a prefix and make this process faster!
-
Sync Type: you can choose between INCREMENTAL and FULL_TABLE.
- Incremental: every time the extraction happens, we’ll get only the new data - which is good if, for example, you want to keep every record ever fetched.
- Full table: every time the extraction happens, we’ll get the current state of the data - which is good if, for example, you don’t want to have deleted data in your catalog.
- Click Next.
4. Configure data source
Describe your data source for easy identification within your organization, not exceeding 140 characters. To define your Trigger, consider how often you want data to be extracted from this source. This decision usually depends on how frequently you need the new table data updated (every day, once a week, or only at specific times). Optionally, you can determine when to execute a full sync. This will complement the incremental data extractions, ensuring that your data is completely synchronized with your source every once in a while. Once you are ready, click Next to finalize the setup.5. Check your new source
You can view your new source on the Sources page. If needed, manually trigger the source extraction by clicking on the arrow button. Once executed, your data will appear in your Catalog.Streams and Fields
Below you’ll find all available data streams from Slack and their corresponding fields:Users
Users
This stream contains information about the users in your Slack workspace.Key Fields:
Channels
Channels
This stream provides a list of all public and private channels in your Slack workspace.Key Fields:
Channel Members
Channel Members
This stream lists all members of each channel.Key Fields:
Messages
Messages
This stream contains all messages from the selected channels.Key Fields:
Threads
Threads
This stream contains the replies to messages, also known as threads.Key Fields:
Lists
Lists
This stream contains Slack list metadata. Lists are only synced when you provide
List IDs in the connector configuration.Key Fields:id: The unique identifier of the list.created: Timestamp when the list was created.name: The list name.user: Identifier of the user who created the list.updated: Timestamp when the list was last updated.
List Items
List Items
This stream contains the items (field values) inside each Slack list.Key Fields:
id: The unique identifier of the list item.list_id: Identifier of the associated Slack list.date_created: Timestamp when the item was created.fields: Array with the list field keys and values.updated_timestamp: Timestamp when the item was last updated.
Data Model
The diagram below shows how the different Slack streams are related to each other.If you encounter any issues, reach out to us via Slack, and we’ll gladly assist you!
Skills for agents
Download Slack skills file
Slack connector documentation as plain markdown, for use in AI agent contexts.